How to add Google AdSense ads to your WordPress website

After creating a successful website with good content, you would want to make some money out of it. One of the many ways to monetize our website or blog is to place Google Adsense on your website. Google’s Adsense, although not the only ad program, is the go-to for many bloggers, both old and new. It is easy to get accepted and equally easy to get started.
Google gives you the opportunity to sell a space on your website or post to display ads and get paid for it. This has become one of the most easiest and fastest way to make money online with your website.
To make money from Adsense, you have to place Google’s ads on your blog. In this article, I will explain how to better place Google Adense ads to your WordPress website in order to make money.
What is Google AdSense?
First things first. Let’s get it straight with what the Google Adsense program is. Google Adsense is simply an advertising network owned by Google. The program allows bloggers and website owners to monetize their posts or website to make money by placing text, image, etc ads on their websites. Google uses a very efficient algorithm to choose the best and suitable ads to display on your website or post. For instance, if someone who has been searching about some types of electronics, example say laptops, visits your blog, Google will display ads on electronics and laptops for him or her. This increases the likelihood that the person will click on the ad and probably make some purchases. In the same vein, someone who has been searching on health or a particular health product will likely see health-related ads on your blog. Google does what is called targeted ad display.
The website owner doesn’t have to worry about contacting advertisers. Google does all that for him. This makes the program hassle-free. Google engages the advertisers, takes money from them, deduct their commission and credit the rest to your account.
Cost Per Click (CPC)
You may have probably heard of Cost Per Click (CPC). This is the unit amount Google pays to you if a user clicks on your ad. The CPC differs from website to website due to a number of factors.
How to get started with Google AdSense
Step 1: The first step is to sign up for Google Adsense account if you do not already have a Gmail account.
Step 2: After signing up and submitting your application, Google will have to review your application so you would have to wait for a few hours to weeks.
Step 3: If your Adsense application is approved, you would now proceed to login and begin to create ads for your website. To create ads for your website, Google provides you with an ad code in HTML and JavaScript to place on your website.
Placing ads on your website is done manually by inserting the code provided by Google in your website. There’s however a recent alternative by Google called auto ads. As the name suggests, auto ads allow the website owner to place just one snippet of code and Google will automatically decide when, where and number of ads to show on each of your pages.
We will discuss both the manual and the automatic ways of placing ads on your website. We advise that you start with the manual method of placing ads on your website to familiarize yourself with the practice and later employ the automatic method too.
How to manually place Google AdSense Ads code on your WordPress Website
SIGN IN FIRST: Login into your Google Adsense account if you have not already done that.

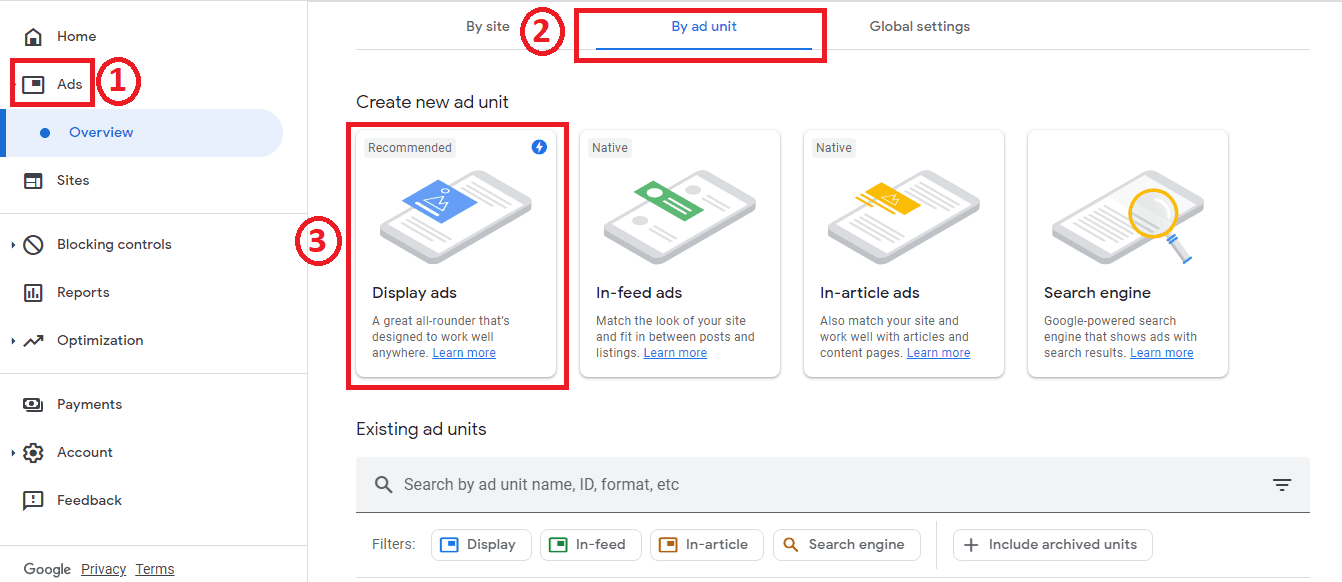
Step 1: Click on the Ads menu on the left column.
Step 2: Click the “by Ad Unit”
Step 3: Click the “Display Ads” to create display ads.
Google allows you to create several Ad types like: Display Ads, In-feed Ads, In-article Ads. Each type of Ad has perculiar properties.
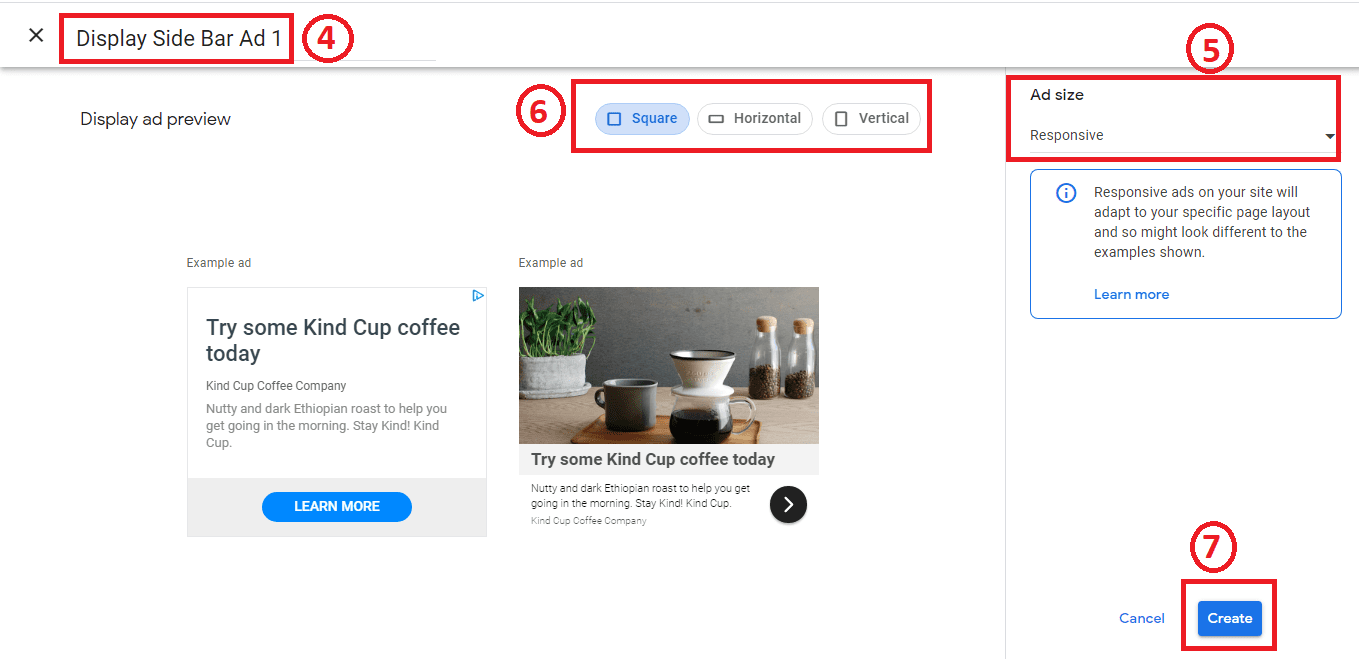
Step 4 : Google wants you to label your ad units for easy identification. On your extreme top left, there’s a space for you to provide a name for this ad unit. The name of the ad is only used internally by Google and it has no bearing on the quality of the ad you place on your site. However, giving it a name to describe the type of ad may help you identify your ads if you would want to know those performing well or if you check the analytics. You may label the ad as “Display Ad 1”. You may also label it based on where you want to place it. Example, “Side Bar Ad 1”. Or you may want to combine both its type and place in the description as “Display Side Bar 1”.
Step 5 : Determine the size of the ad. You may choose Responsive or Fixed. Responsive makes the ad responsive to the sizes of several devices such that the ad automatically resizes to to adjust to the screeen. If you choose fixed, you have to determine the width and height of the ad.
Note that: Fixed-sized ad units may limit the number of ads available and can therefore result in lower earnings than responsive
Step 6: Your ad is by default of square shape. You may change it to a horizontal or vertical shape.
Step 7: Click Create to create your ad.
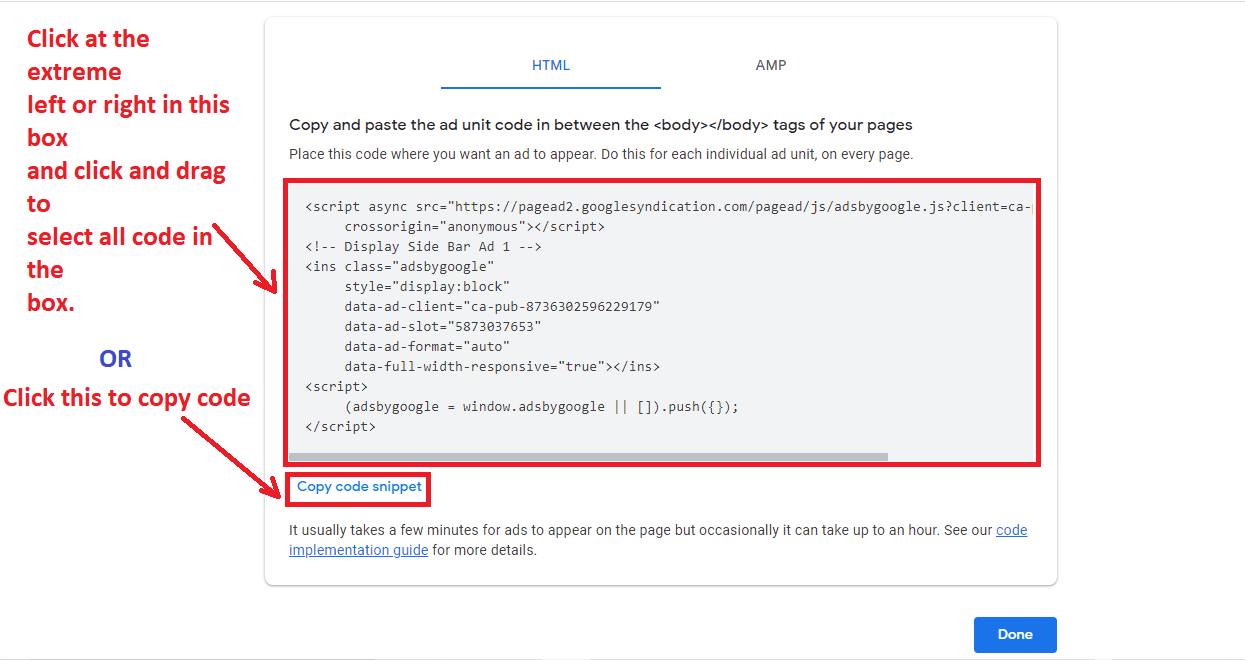
Step 8: Click “Copy Code Snippet” to copy the HTML code. This code will be placed in your widgets or may use a plugin to place the code in your posts.
You may also copy the code by clicking in the extreme left or right corner in the box and click and drag to select the HTML code.
The code is copied onto the computer’s clipbaord. If you so desire, you can paste the code in any text editor like Notepad.
Now, code is generated and copied. how do I place it on my WordPess Website?
After copying the code snippet from the Google Adsense, it is now time to place the code your website. First, you have to determine where to place your code. You may show the ad in your sidebar, Footer area, Before post, within post, after post etc
Step 1: Go to your WordPress dashboard. Click Appearance >> Widgets in your dashboard admin area.
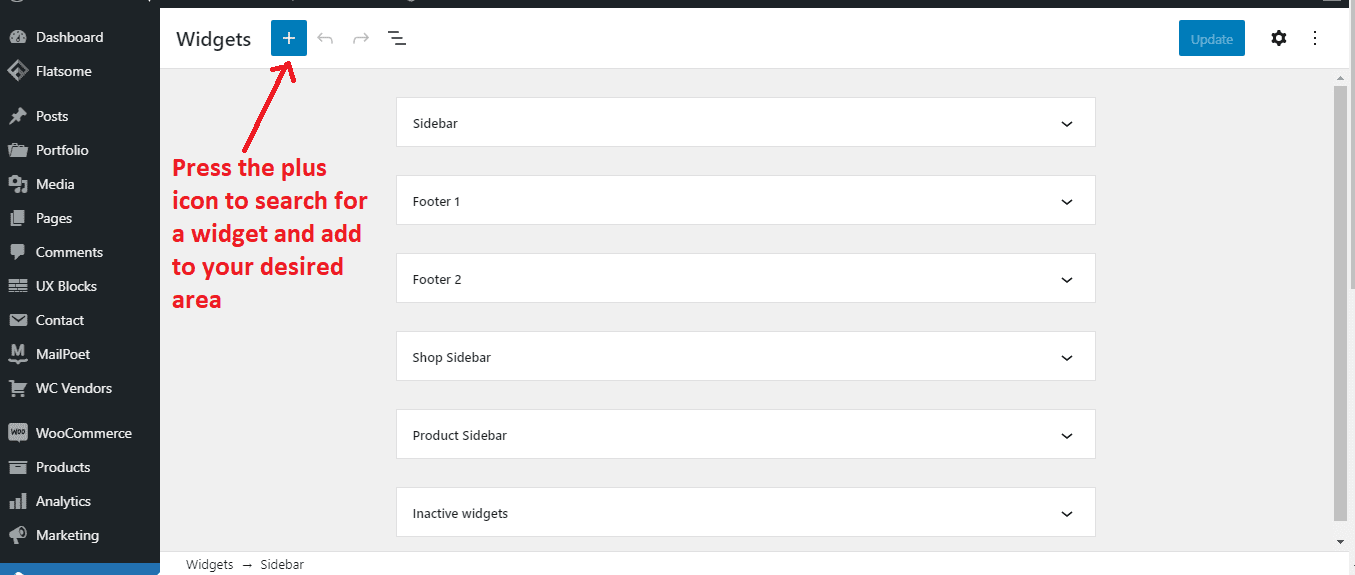
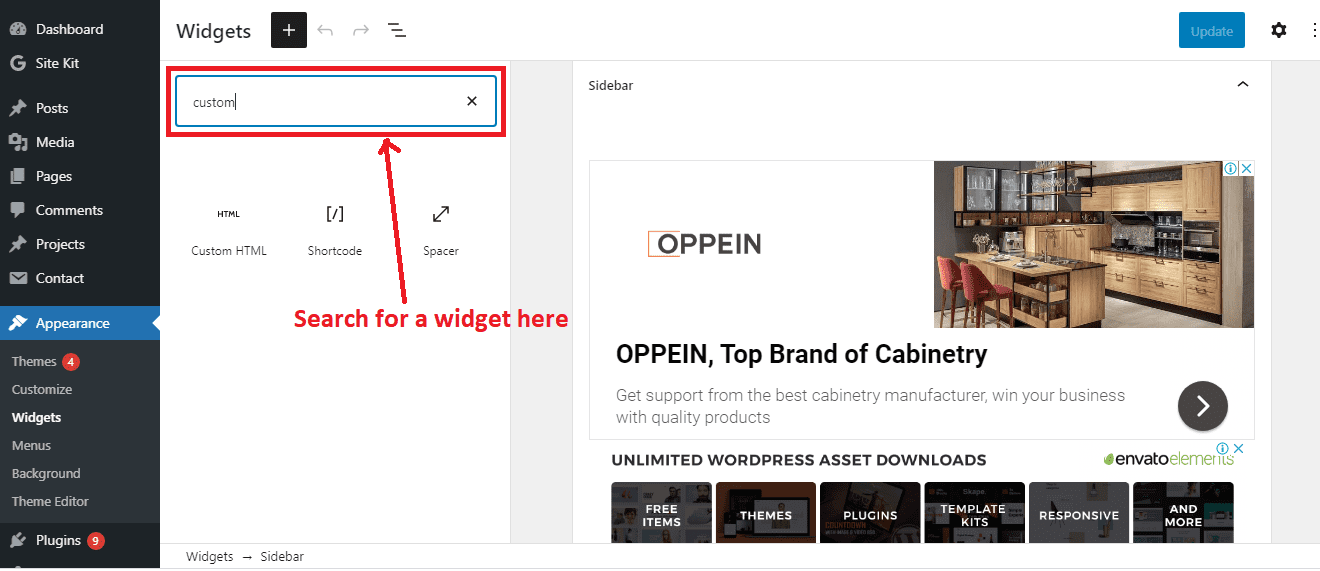
Step 2: Move the widget into the sidebar or footer you want the ad to appear
If you are like me who feels much more at home with the old classic interface, then you can switch to it. Chances are that you will get a prompt to switch to the classic interface when you go to Appearance>>Widgets.
If you have already closed the window of that prompt, get the classic plugin here.
The interface of the classic widget
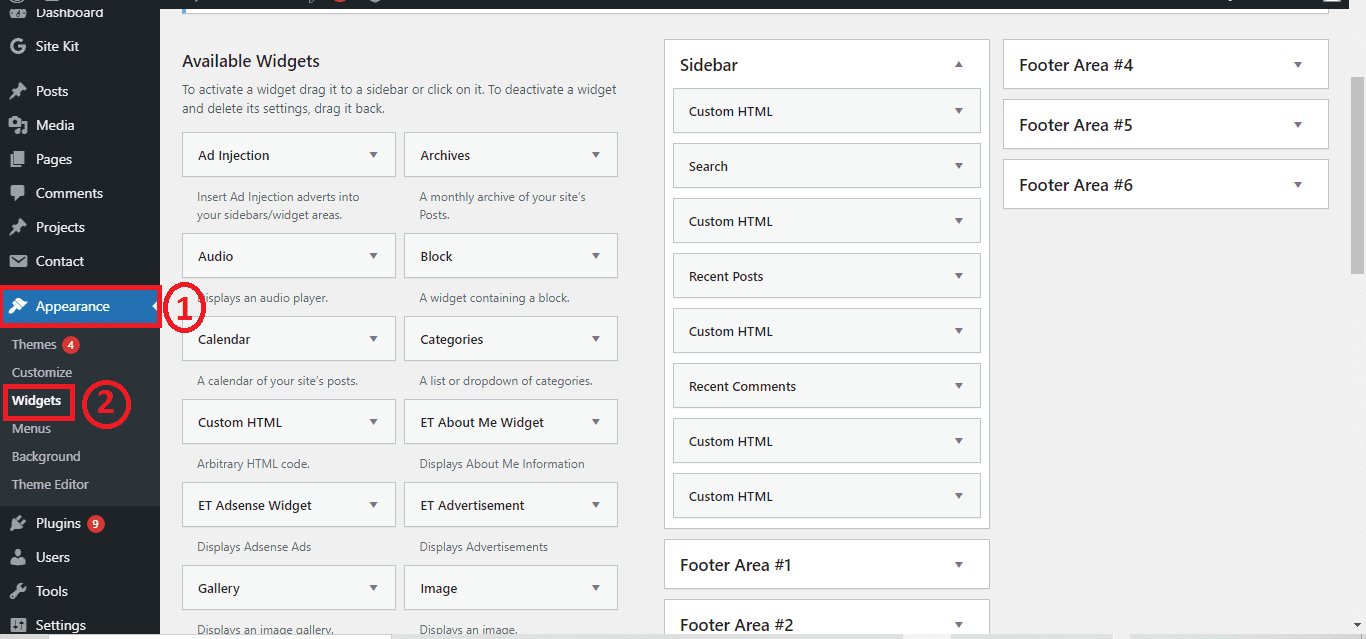
The classic view of widget
Moving a Custom HTML block to a side widget to a post AdSense code
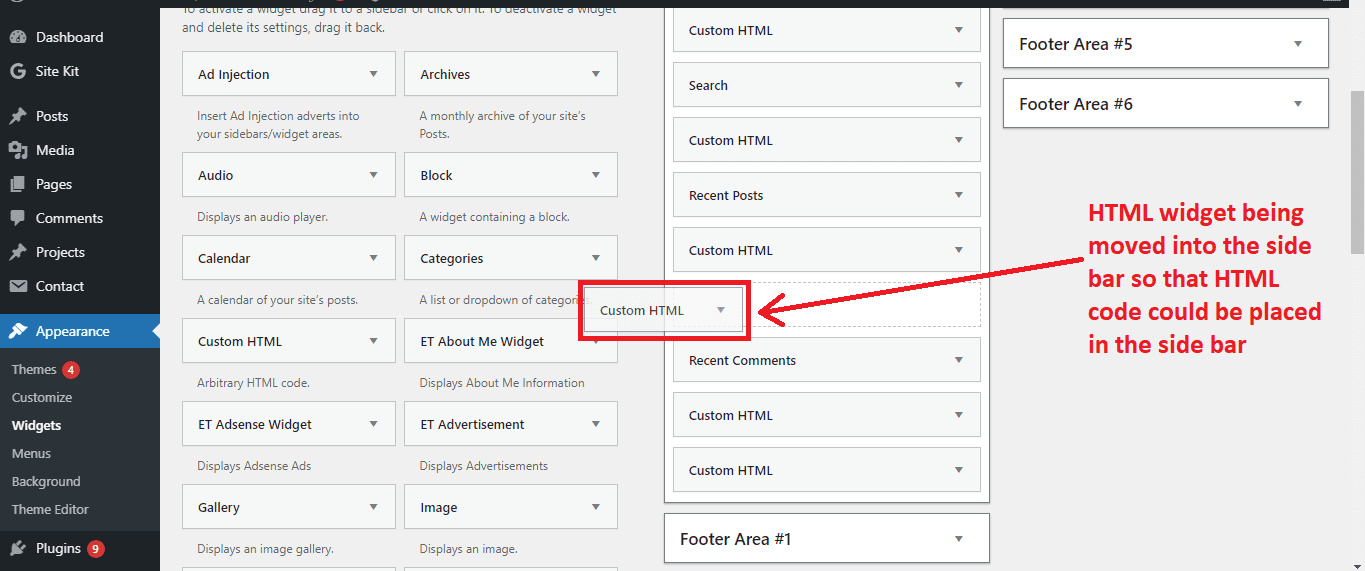
In the above image, a custom HTML block is being moved into a side widget. This allows you to past the Google AdSense code in it.
Adding Auto Ads in WordPress
The auto-ads code will generate and display ads everywhere on your WordPress website with just a single code snippet. You have to add the code to all pages you want to display the ad.
Auto-Ads takes away the hassle of manually adding the code in several areas in your website. Add the ads manually is time-consuming. Besides, most beginners have difficulty in figuring out the best place to even place their ad codes.
We should however point out that one giveaway in auto ads is that you have less control over where the ad appears on your site.
Steps in generating code snippet for Auto Ads insertion in WordPress Website
Step 1: Log into your Google AdSense account.
Step 2: Click on the Ads tab.
Step 3: “By Site” will already be selected. If not selected, click on it to select\
Step 4: Click Get code to get the code snippet. AdSense will generate a code for you using your your publisher ID
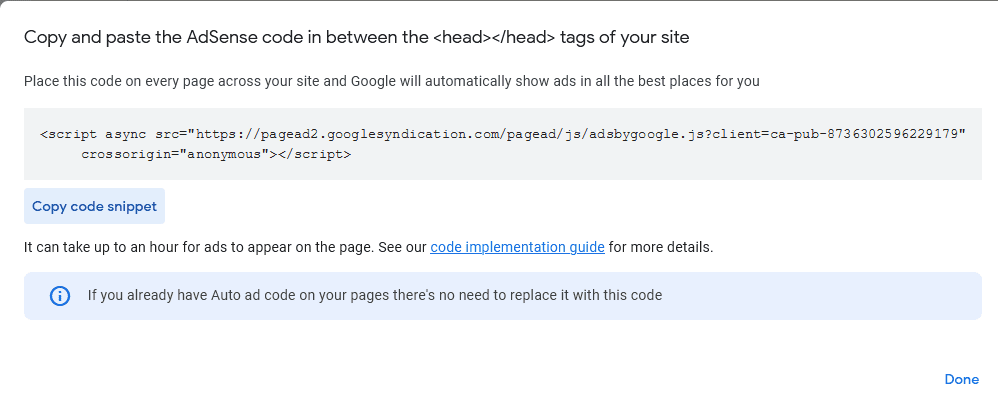
Steps in inserting the AdSense auto-ads code in your WordPress Website
As the name suggests, auto-ads code utililizes a single code snippet to create ads at various regions on your WordPress website. To make the ad appear on multiple pages, it thus implies that you have to add the code to all these pages.
There are quite a number of ways this can be achieved. One way to achieve this is to add the code to your theme’s header.php file. But hold on, there is one downside to this. Anytime you update your theme, the code snippet will be erased from your theme’s code because it is seen as a junk or at best, a piece of foreign code. To avoid this, you can add the code snippet to the child’s theme of your WordPress theme.
In WordPress, a child theme is a sub-theme or derived theme which inherits all the functionality of the parent or original theme. Child themes do not change when the parent theme is updated, thus, your code snippet is maintained on the website. Child themes are the safest way to modify your WordPress theme so that you don’t end up causing any serious havoc to your theme.
Using a plugin to insert auto-ads into your WordPress Website
The power of WordPress is felt in its avalanche of plugins for almost everything. The easiest way to throw ads into your WordPress website without any hassle is by using a plugin.
Step 1: Download and install the plugin Insert Headers and Footers
Step 2: Click on Pluglins on your dashboard and click Add New. This shows the Upload page for the plugin
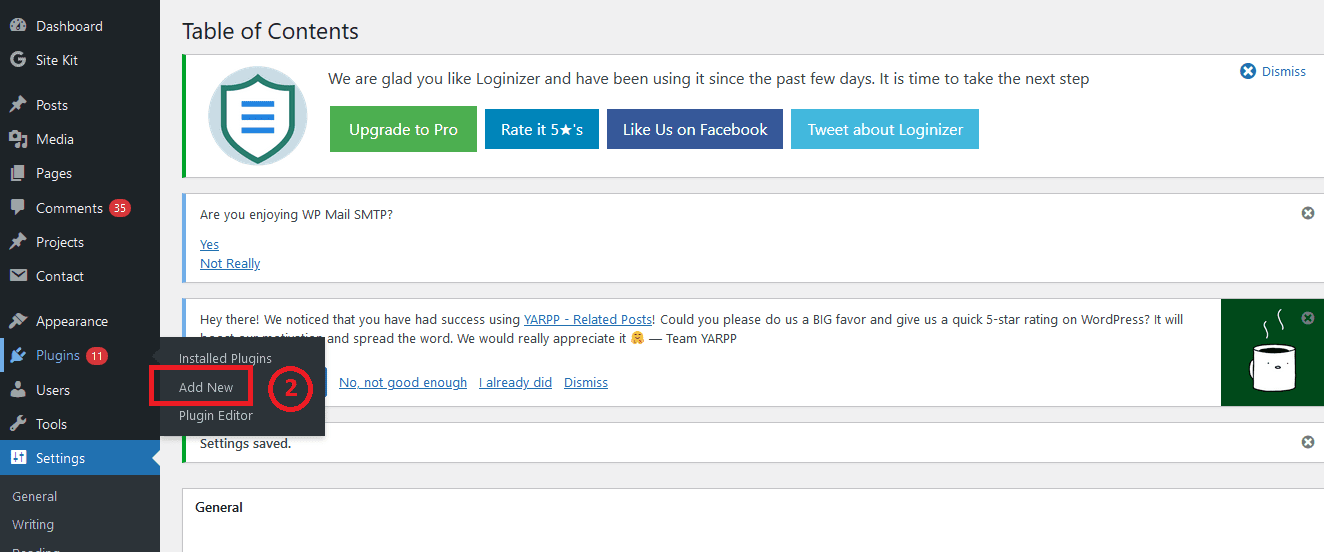
Step 3: Click Upload Plugin. This gives you a page to browser to the downloaded plugin to install
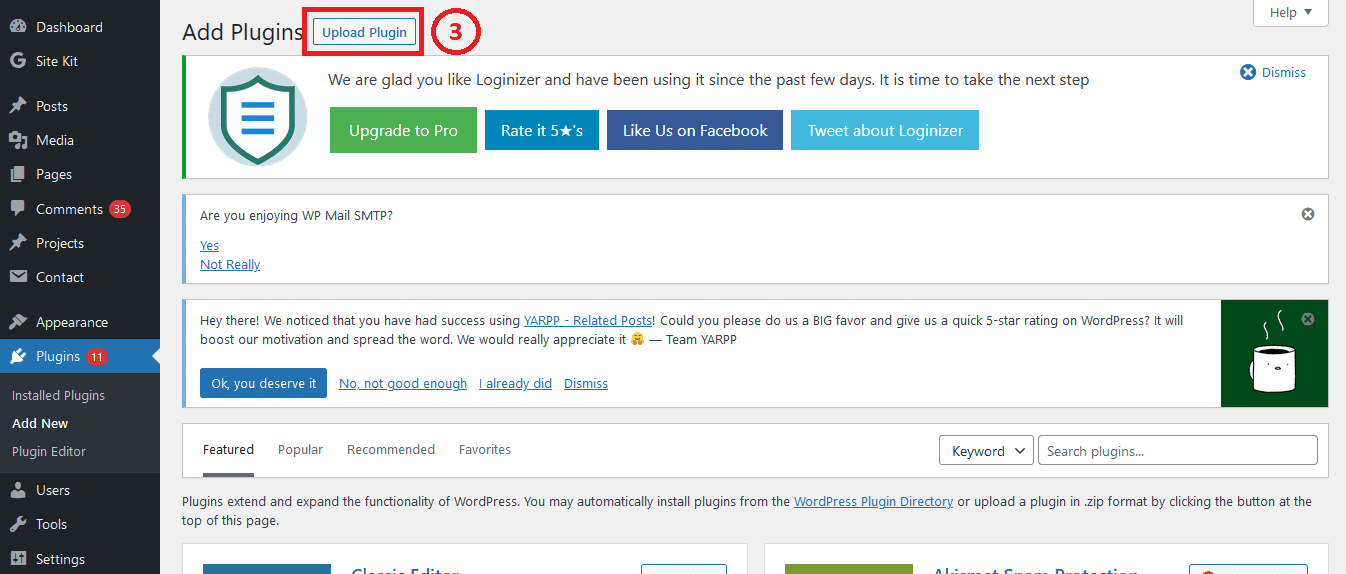
Step 4: Click Browse to locate the downloaded plugin to upload.
Step 5: Click Install Now to install the plugin
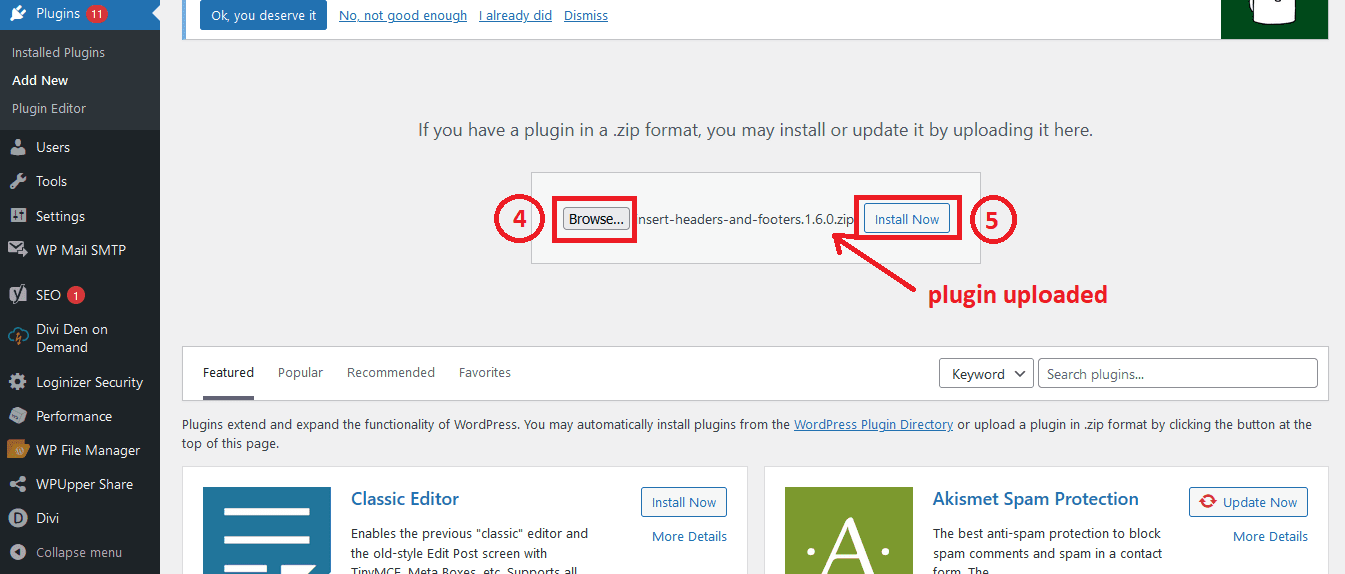
Step 6: Click Activate to activate the plugin.
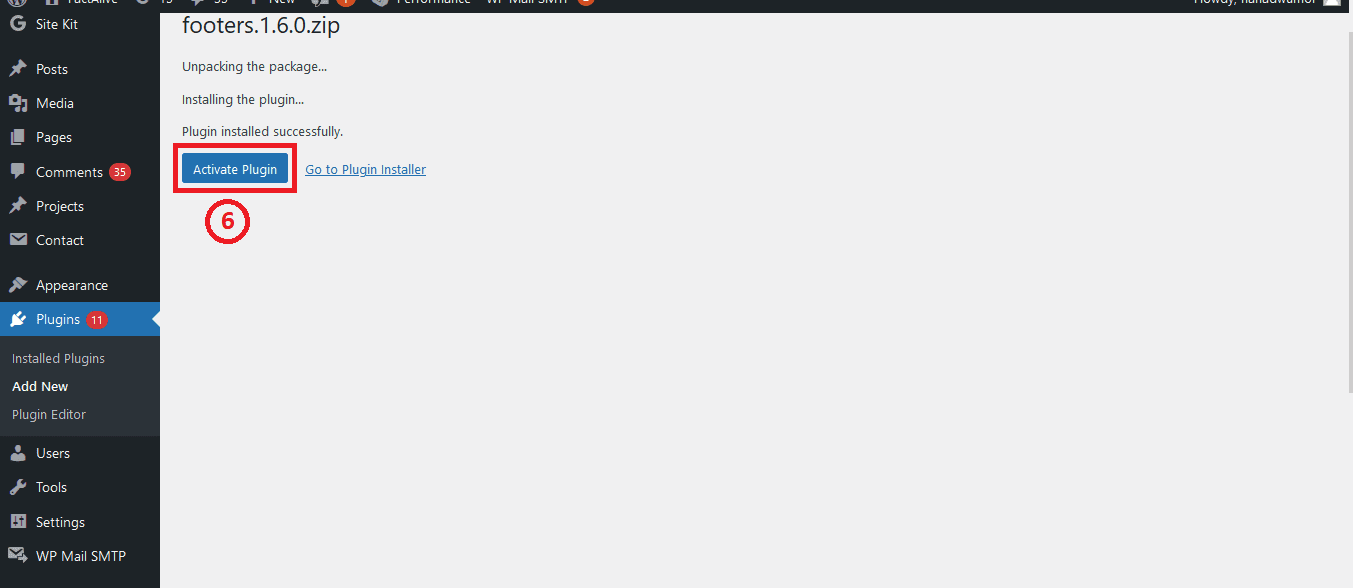
WordPress will now display a success message to alert you that the installation of the plugin is successful
Using the Insert Headers and Footers to insert the AdSense code
Step 1: Click Settings>>Insert Headers and Footers.
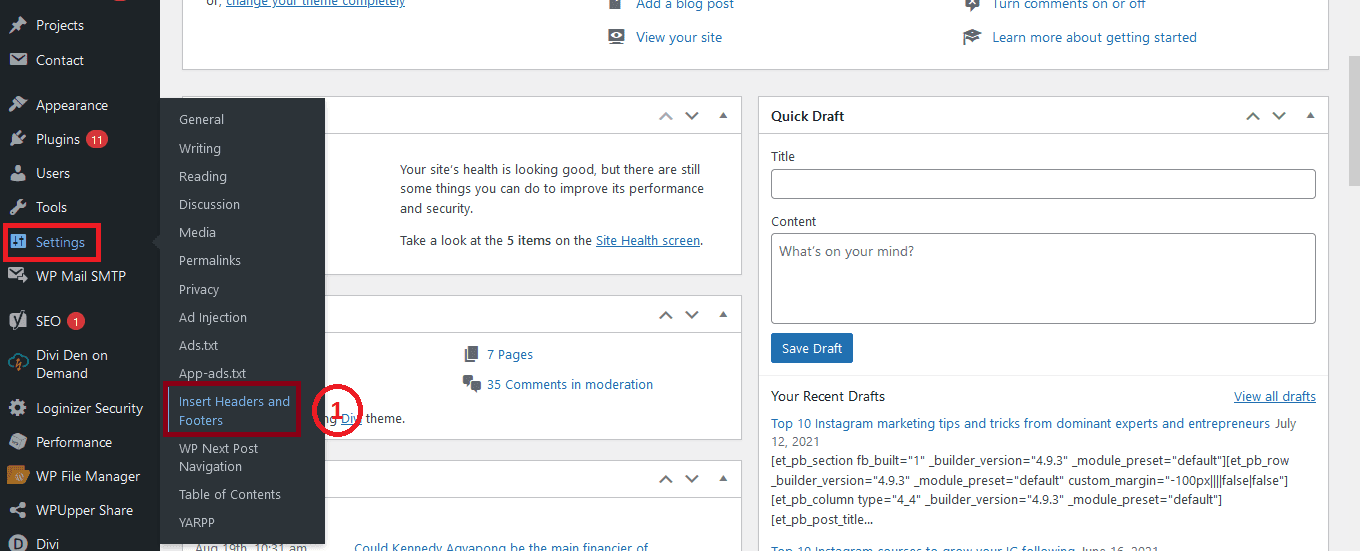
Step 1: Click Settings>>Insert Headers and Footers.
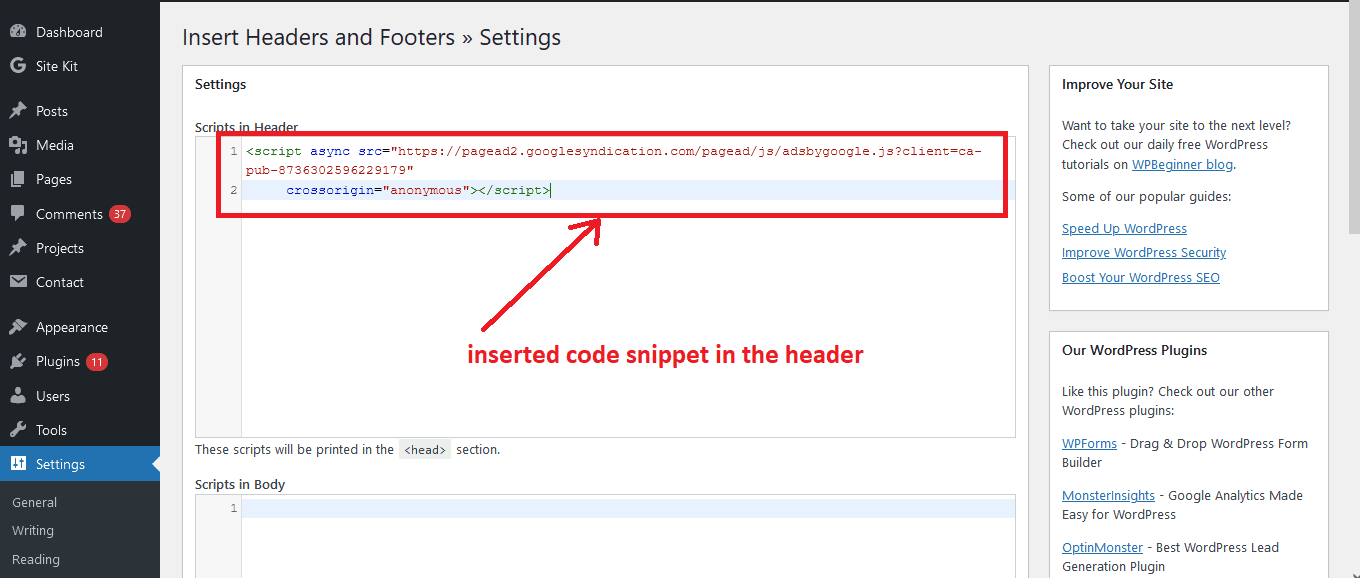
Step 2: Paste the copied code snippet in the required region. In this example, I pasted the code int the header
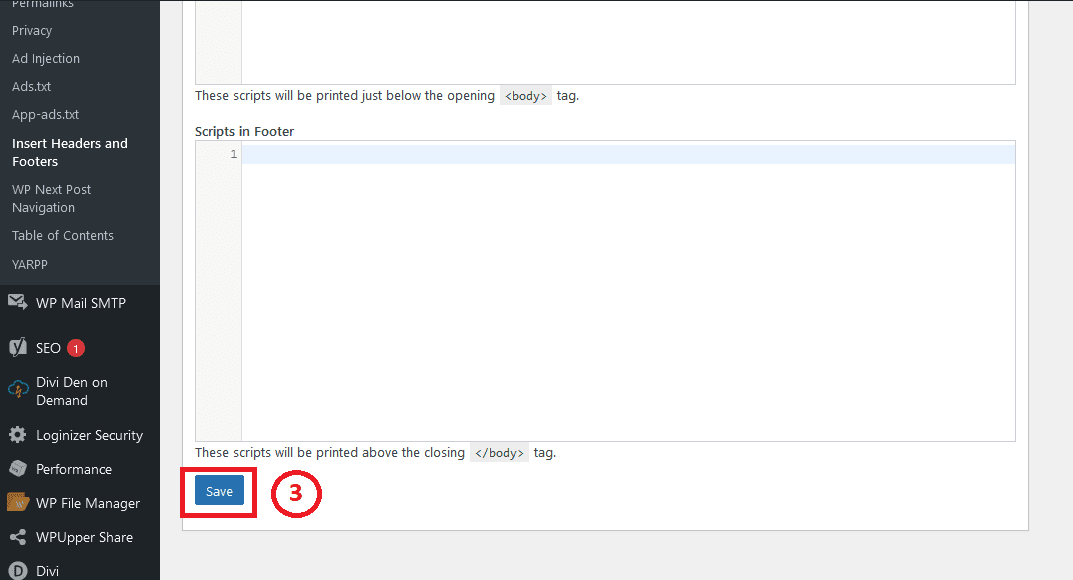
Step 3: Click save to save your settings
Google AdSense may take some few time to incorporate code and will start to show ads on your WordPress Website
